Tuesday, October 11, 2011

DUAL TABLE ISSUES.

The SYS-owned dual table was introduced by Oracle long back and since then the Application
Development team across the globe has been using this table for some internal processing.

Getting multiple rows in DUAL can cause a variety of known issues.

If multiple rows are encountered,

for 9i and prior releases the DUAL Insertion and Deletion behavior was different from that in 10g and up.

In 9i and earlier versions the DUAL behavior was as follows:

SQL> connect sys/ as sysdba
SQL> select * from dual;
D
-
x
SQL> insert into dual values('Y');
SQL> insert into dual values('Z');
SQL> commit;
SQL> select count(*) from dual;
-> 3 rows
SQL> select * from dual;
-> retrieves only 1 row even if more rows exist
SQL> delete from dual;
SQL> commit;
SQL> select count(*) from dual;
-> 2 rows, only 1 row was deleted

In other words:

A "Delete from dual", statement without a where clause deletes only one row regardless of how many
rows it contains.

An "Insert into dual", works, and you can insert any number of rows, but when executing
"select * from dual", it returns only one row, but "select count(*) from dual", returns the number of rows that really was inserted.

For 10g and up the dual behaviour has changed as follows:
select * from dual;

D
-
X

select count(*) from dual;

COUNT(*)
----------
1

insert into dual select * from dual;

1 rows created.

select count(*) from dual;

COUNT(*)
----------
1

select * from dual;

D
-
X

delete from dual;

1 row deleted.

select * from dual;

D
-
X

select count(*) from dual;

COUNT(*)
----------
1

In Other words,

For 10g the dual behavior has changed to handle the multiple rows issue. But still it accepts multiple insertion to it and there is no way to know how many rows has been inserted as the Select count (*) returns
only 1 regardless of how many rows has been inserted, therefore TRUNCATE the DUAL then inserting the row again is the only way to bypass the issue.

To know exactly how many rows exits in 10g?

Create table test as select * from Dual;

Select count(*) from dual (it will show only 1 row irrespective it has more then 1 row also)

COUNT(*)

----------

1

select count(*) from test; (it will show the exact values)

COUNT(*)
----------------
3

###################################

How to Recreate the Dual Table:

. Shutdown the database

2. Startup the database in upgrade mode:

sqlplus / as sysdba
SQL> startup upgrade


3. Recreate the DUAL table:

create table dual
(dummy varchar2(1))
storage (initial 1)
/
insert into dual values('X')
/
create public synonym dual for dual
/
grant select on dual to public with grant option
/


4. Verify whether the DUAL table layout is correct:

column OWNER format a15;
OBJECT_NAME format a20;
select OWNER,OBJECT_NAME,OBJECT_TYPE,CREATED from dba_objects where object_name='DUAL';

Example output:

OWNER OBJECT_NAME OBJECT_TYPE CREATED
--------------- -------------------- ------------------- ---------
SYS DUAL TABLE 16-JUN-09
PUBLIC DUAL SYNONYM 16-JUN-09

5. Restart the database in normal mode

#############################


Monday, October 10, 2011

Using a Standard API to assign and Revoke Role/Responsibilities to a User.

col user_name for a15
col responsibility_name for a50
col user_guid for a35
select a.user_name,to_char(a.end_date,'DD-MON-YYYY')"User End",to_char(b.start_date,'DD-MON-YYYY')"Resp St",to_char(b.end_date,'DD-MON-YYYY')"Resp End",c.RESPONSIBILITY_NAME
from apps.fnd_user a,apps.fnd_USER_RESP_GROUPS b,apps.FND_RESPONSIBILITY_TL c
where a.USER_ID=b.USER_ID and b.RESPONSIBILITY_ID=c.RESPONSIBILITY_ID
and b.RESPONSIBILITY_APPLICATION_ID=c.APPLICATION_ID and a.user_name=upper('&fnd_user') order by 5;

set lines 200 pages 999;
col ROLE_NAME for a60;
select USER_NAME,ROLE_NAME,USER_START_DATE,USER_END_DATE,ROLE_START_DATE,ROLE_END_DATE,EFFECTIVE_END_DATE from apps.WF_LOCAL_USER_ROLES
where user_name = upper('&fnd_user');

select USER_NAME,ROLE_NAME,USER_START_DATE,USER_END_DATE,ROLE_START_DATE,ROLE_END_DATE,EFFECTIVE_END_DATE,END_DATE from apps.WF_USER_ROLE_ASSIGNMENTS
where user_name = upper('&fnd_user');

package to delete the responsibility:

SQL> Begin
fnd_user_pkg.delresp(
'&User_Name',
'&Res_Short_Name',
'&Responsibility_Key',
'&Security_Group');
commit;
End;


select * from fnd_security_groups
where security_group_key = 'STANDARD';

go to security user - > define -> enter the username
go to tools -> diagonise and enable the trace
and u can monitor waht is happining to that user when u are running anything backend to disable the user or delete the user.


############

1. Assign role to a user using an API

To assign role to a user using APIs, use the following API wf_local_synch.PropagateUserRole.

Example:

Begin
wf_local_synch.PropagateUserRole(
p_user_name => '&USER_NAME',
p_role_name => '&ROLE_KEY');
commit;
end;

2. Add a responsibility to a user using API fnd_user_resp_groups_api.Insert_Assignment

To add a responsibility to a user using and API, use the following API fnd_user_resp_groups_api.Insert_Assignment:

Example.

begin
fnd_user_resp_groups_api.Insert_Assignment (
user_id =>&USER_ID ,
responsibility_id => &RESP_ID,
responsibility_application_id =>$APPL_ID ,
start_date => &START_DATE,
end_date => &END_DATE,
description =>'Sample
example' );
commit;
end;

This shall raise an error if the responsibility is assigned to a user,
but if needed to update the responsibility assignment in case of responsibility existence,
use the following API:

begin
fnd_user_pkg.addresp(
'&User_Name',
'&Responsablity_Application_Short_Name',
'&Responsibility_Key',
'&Security_Group',
'&Description',
'&Start_Date',
'&End_Date' );
commit;
end;

3. Revoke a responsibility assignment to a user using fnd_user_pkg.delresp

To revoke a responsibility assignment to a user using an API, use fnd_user_pkg.delresp.

Example:

Begin
fnd_user_pkg.delresp(
'&User_Name',
'&Responsibility_application_short_name',
'&Responsibility_Key',
'&Security_Group');
commit;
End;

This simply end date the responsibility assignment to a user by the current system date.

4. Revoke an Indirect Responsibility

To revoke an indirect responsiblity (roles assigned using UMX) assignment to a user using APIs, use the following API Wf_local_synch.PropagateUserRole.

Example:

Begin
Wf_local_synch.PropagateUserRole(
p_user_name => '&USER_NAME',
p_role_name => '&ROLE_KEY',
p_start_date=>'&Start_Date',
p_expiration_date=>'&End_Date');
commit;
End;

End date the parent Role and it shall end date the remaining Roles.


Thursday, September 29, 2011

How to directly launch the forms in R12.
Check the profile option : ICX: Forms Launcher

Query to find out the value of that profile option :
set wrap off
set verify off
set pagesize 1000
set lines 1000
col profile format a30
col v_profile format a100
col scope format a11
col value_scope format a20
col level_value noprint
undefine profile
spool profiles
select p.user_profile_option_name profile
, '1 - Site' Scope
, 'Site' Value_scope
, v.level_value
, v.profile_option_value v_profile
from fnd_profile_option_values v
, fnd_profile_options_vl p
where v.profile_option_id = p.profile_option_id
and (v.level_id = 10001)
and p.user_profile_option_name like '%&&profile%'
Union
select p.user_profile_option_name
, '2 - Appli.'
, a.application_short_name
, v.level_value
, v.profile_option_value
from fnd_profile_option_values v
, fnd_profile_options_vl p
, fnd_application a
where v.profile_option_id = p.profile_option_id
and (v.level_id = 10002 and a.application_id = v.level_value)
and p.user_profile_option_name like '%&&profile%'
Union
select p.user_profile_option_name
, '3 - Respon.'
, r.responsibility_name
, v.level_value
, v.profile_option_value
from fnd_profile_option_values v
, fnd_profile_options_vl p
, fnd_responsibility_vl r
where v.profile_option_id = p.profile_option_id
and (v.level_id = 10003 and r.responsibility_id = v.level_value)
and p.user_profile_option_name like '%&&profile%'
Union
select p.user_profile_option_name
, '3 - User'
, u.user_name
, v.level_value
, v.profile_option_value
from fnd_profile_option_values v
, fnd_profile_options_vl p
, fnd_user u
where v.profile_option_id = p.profile_option_id
and (v.level_id = 10004 and u.user_id = v.level_value)
and p.user_profile_option_name='&a'
order by 1,2,3;
#########################################################
select user_profile_option_name,
decode(level_id,10001,'Site',
10002,'Appl',
10003,'Resp',
10004,'User',
10005,'Server',
10006,'Organization',
level_id) "Level",
profile_option_value, level_value lvl_val
from fnd_profile_option_values, fnd_profile_options_vl
where user_profile_option_name like ('%'||'&profile'||'%')
AND fnd_profile_option_values.profile_option_id =
fnd_profile_options_vl.profile_option_id;

####################################################
It will ask for 2 Inputs... %ICX%
Output :
for 11i
ICX: Forms Launcher 1 - Site Site https://erpwebapps.test.com:443/dev60cgi/f60cgi

for R12
ICX: Forms Launcher 1 - Site Site http://erpwebapps.test.com:443/OA_HTML/frmservlet

we can directly launch with this URL.. but authentication for secure mode should be off..before u can launch it.

##########################################

For Doing secure server off in 11.5.10
1. Backup and open $APPL_TOP/admin/_.xml context file
2. Update the context variable:
s_appserverid_authentication
By default in 11.5.10, this is set to SECURE.
In previous 11i versions, this was set to OFF.
For debug purposes, you can use ON or OFF.

Modes:
- ON : Partial
- SECURE : activates full server security (SECURE mode)
- OFF : deactivates server security
3. Run Autoconfig to instantiate the change.
You should now be able to access forms directly again using the f60cgi call.

4. After you have finished your Forms debugging, please reset s_appserverid_authentication to SECURE and re-run Autoconfig.

Alternative option
Running Autoconfig is the preferred method of updating s_appserverid_authentication.
If you are unable to run Autoconfig during troubleshooting, you can run the the following commands instead from $FND_TOP/secure

Disable:
java oracle.apps.fnd.security.AdminAppServer apps/apps AUTHENTICATION OFF DBC=host_visdemo1.dbc

Enable:
To activate basic server security, from the command line,enter:
jre oracle.apps.fnd.security.AdminAppServer apps/apps AUTHENTICATION ON DBC=

To activate full server security (SECURE mode), from the command line, enter:
jre oracle.apps.fnd.security.AdminAppServer apps/apps AUTHENTICATION SECURE DBC=

Check the status:
java oracle.apps.fnd.security.AdminAppServer apps/apps STATUS DBC=host_visdemo1.dbc

For doing secure mode off in R12
Application Server Security can be in one of three states:

1)OFF: Server security and Code ID’s are not checked which means any application server machine can access the database. This option is usually used on test instances or if you have full control over the software all machines to physically access your database.

2)ON: This is a case where some level of trust is required to access the database. In this setup either the application server must be registered with the database or the code must pass a module and version ID known to be trusted. Use this option only if you wish to maintain compatibility with application servers that you cannot yet patch to the code level required for best security.

3)SECURE: This setup is used when ever full trust is required for access to the database. Only registered application server machines and only trusted code modules may connect to the database. This is the default setting for Release 12.

Server Security Status
To check the Server Security status for a particular database use the STATUS command in the AdminAppServer utility and pass the dbc file corresponding to the database.The STATUS command will display whether server security is turned on and whether the server ID
in the dbc file is currently valid.
java oracle.apps.fnd.security.AdminAppServer apps/apps STATUS DBC=

Adding, Updating, or Deleting Server Ids
Application servers can be registered as trusted machines with a database server by generating a large random ID number and storing it in both the application server and the database. When the application server attempts to connect to the database it supplies its server ID. The database will then verify that it matches to that of a trusted machine. The server ID is stored as a parameter in the DBC file for each application server, which can also be defined as an environment variable. The AdminAppServer utility is used to generate server IDs and then register them with a database server.

1. Add server ID as:
Server ID’s are added to the database automatically when AdminAppServer
is ran to create a dbc file.
java oracle.apps.fnd.security.AdminAppServer apps/apps \
ADD [SECURE_PATH=$FND_TOP/secure] \
DB_HOST= \
DB_PORT= \
DB_NAME=

2. Update server ID.
Update an application server's server ID from the command line as:
java oracle.apps.fnd.security.AdminAppServer apps/apps UPDATE DBC= APPL_SERVER_ID
Note: By providing the APPL_SERVER_ID argument, you will force a new server ID to be
generated and added to your DBC file. If the APPL_SERVER_ID argument is not provided,
AdminAppServer will take care of syncing up the server ID's of your dbc file and your
database automatically, if required.

3. Delete server ID
AdminAppServer utility is used to delete server ID’s follows:
java oracle.apps.fnd.security.AdminAppServer apps/apps DELETE DBC= APPL_SERVER_ID

Activating and Deactivating Server Security
Server security feature can be turned to OFF, ON, or SECURE mode using the AdminAppServer utility. When the server security is turned off the server ID’s are not changed or deleted.Server security can be re-enabled without having to recreate server IDs for existing registered application servers.

On UNIX:
A. Enter the following command to activate basic server security:
java oracle.apps.fnd.security.AdminAppServer apps/apps AUTHENTICATION ON DBC=

B. Enter the following command to activate full server security (SECURE mode):
java oracle.apps.fnd.security.AdminAppServer apps/apps AUTHENTICATION SECURE DBC=

C. Enter the following command to deactivate server security:
java oracle.apps.fnd.security.AdminAppServer apps/apps AUTHENTICATION OFF DBC=

Wednesday, August 24, 2011

Pasta Setup With Oracle E-Business Suite
Pasta Technology provides strength in multilingual support in oracle E-Business suite in particular areas that include printing(Pasta),viewing a report on-line (VPasta) and generating bitmap reports (IX Library).Pasta products make a significant contribution to UTT8 support but it also works for any other character set that oracle support

Objectives:

1.Pasta Architecture
2.How Pasta Works
3.Pasta Configuration Flow
4.Printing Requirement analysis
5.The Preparation phase
6.The Setup Phase
7.Setting Pasta In Debug Mode


Pasta Architecture

when user sends printing request it connects to database and the concurrent manager fetches the request from the queue and pass to Reporting engines where all the oracle E-business suite Components are present. The Reporting Engine sends the reports in the form of Text and it also send the reports in the Form of Bitmap formats(HTML/PS/PCL/PDF) If u what to see the Preview of the Print then the operating system send the report to Report Review Agent , and pass to output in the form of HTML/text to Visual Now pasta works here..when ever reporting engines sends a text report it sends to pasta executable automatically.The Executable will generate the Post scripts files from the reports.Now the user can print the commands using operating system printing command. And for Bitmap reports the Pasta IX library generates the bitmap directly.And Vpasta is the component of pasta where we preview the Visual HTML


Pasta Executable FNDPSTAX


Pasta executable, a.k.a. simply "Pasta", is an executable file for enabling the multilingual printing. Pasta executable works as a printer command of Oracle E-Business Suite and handles text outputs generated by the Concurrent Manager. Any UTF8 customer who possibly has non-English data in the database must use Pasta. English-only customer or a customer who is using other character set than UTF8 can also obtain the benefit from Pasta. This product is provided as a part of AOL product.


Vpasta

VPasta is an alternate choice of the viewer of the Report Review Agent. VPasta is required for an environment that has Bidi language installed. Non-Bidi language user on such an environment might have to use VPasta as well.This product is provided as a part of AOL product.

IX Library


The IX library enables Oracle Reports to generate PostScript with any characters in any character set, including UTF8, by embedding a TrueType (ttf) font in the output.UTF8 customer who has a customized PostScript report must use IX library. PDF output with multi-byte characters is not supported in Oracle E-business Suite 11i. This product is implemented in Oracle Reports and works closely with Oracle Toolkit


How Pasta works

Pasta Requires Two inputs 1) Pasta Text File 2) Pasta TrueType Font Files. We can select the True type Font files In pasta Configuration file(pasta.cfg)
Pasta converts an input content from text format to PostScript format to add the multi-lingual support. During the PostScript conversion, Pasta includes all the necessary information in addition to the language handling such as paper size, font size and so on. After converting the input,Pasta sends the content to preprocess command if it is set in the preprocess option in the Pasta configuration file before printing. The content is then sent to the printer command that is specified in the print Command option in the configuration file. ( pasta.cfg)

The Printer Configuration Flow

There are Three Phases to print the page

  1. Yellow Box-Analysis Phase(Printing Requirement analysis)
  2. Orange Boxes(The Preparation phase)
  3. Blue Boxes(The Setup Phase)

Based on the Analysis we need to edit two files as per the printing requirement and command line arguments will be operating system commands or pasta executables.

The Preparation phase

Printer should be setup at the operating system level. and check if the printer is configured as OS level. $ lpstat -a Example: ALDERSHOT_FC accepting requests since Jan 01 00:00

Configuration:

1) The version of pasta can be checked from $FND_TOP/bin FNDPSTAX is the executable program for pasta.

$FNDPSTAX -v Pasta version 3.0.2.1 - unicode/bidi printing utility. Copyright (c) Oracle Corporation 1999-2003. Current version is 3.0.4.0 Apply patch 3274480 to make Pasta to 3.0.4.0

2) Make sure to back up all the setup files related to the patch to save your customization. There are some files in this patch override the existing files

Example:

$FND_TOP/resource/pasta.cfg $FND_TOP/resource/pst_ix10.cfg $FND_TOP/resource/ixlib.cfg $FND_TOP/resource/ixlibs.cfg $FND_TOP/resource/pastas.cfg $FND_TOP/reports/PSTLL.prt $FND_TOP/reports/PSTPL.prt $FND_TOP/reports/PSTWL.prt $FND_TOP/reports/PSTDL.prt $FND_TOP/reports/GRKINVRPT.prt

3) - Special instructions for each file:

Pasta.cfg File

The main configuration file for Pasta is "pasta.cfg". This is the file used to convert a character mode (ASCII Text) report to Postscript format or another character set before being sent to the printer.It also embeds or references the fonts specified in the pasta.cfg file, either true type or printer resident fonts

pst_ix10.cfg:

Edit and to replace with real path for $FND_TOP and $APPLRSC on the middle tier as well as another customization. Set PASTA option to $FND_TOP/resource/pst_ix10.cfg

ixlib.cfg:

The file ixlib.cfg is used for processing concurrent requests in bitmap mode (Postscript, PDF, etc) required only in a UTF8 character set environment, optional on all other. The ixlib.cfg file is an
IXLibrary configuration file. IX Library is a library feature incorporated within Oracle Reports and Oracle Graphics,which support using true type fonts with bitmap mode reports. IX Library is not a
component of Pasta,but Pasta supports IX Library and the concurrent processing server in the successful printing of bitmap reports.

******Set IX_PRINTING option to $FND_TOP/resource/ixlib.cfg******

When the IX_PRINTING environment variable is set, the true type font(s) specified in the ixlib.cfg configuration file will be used in the generation of the bitmapped report.On a UTF8 character set instance, the default font is typically the Albany font or
any Unicode UTF8 compliant font.

When the IX_PRINTING environment variable is unset, the AFM font(s) specified in the PPD will be utilized. These fonts may not be Unicode UTF8 compliant--in which case,certain characters may not translated correctly.

ixlibs.cfg:
Set IX_PRINTING option to $FND_TOP/resource/ixlibs.cfg

pastas.cfg:
Override pasta.cfg with this file. If you are using pasta.cfg, you can specify pastas.cfg in the arguments in the Pasta printer drivers: "-pn$PROFILES$.PRINTER -f$PROFILES$.FILENAME c$PROFILES$.CONC_COPIES -Fpastas.cfg" Pasta_pdf.cfg is the file used by pasta to print pdf converted to postscript By 3rd party utility.The driver name is PASTA_PDF.

Configuration tip:
The default pasta.cfg is designed to work with most of the PostScript printers but if it isn't meet the requirements, you can change the configuration in the either way as follows.
  • Pasta Looks for the File files pasta_.cfg file if it is not present then it checks for default file.
  • If you have only one printer, you can change $FND_TOP/resource/pasta.cfg directly.
  • If you have more than two printers and these two printers require different setups, then do the following:
- cd $FND_TOP/resource - cp pasta.cfg pasta_.cfg where is your printer name on the operating system. the new file name must pasta_hq_5thfloor.cfg if the name of the printer is "hq_5thfloor". -Make required modification in pasta.cfg and pasta_.cfg.By this setup, PASTA will automatically look for pasta_hq_5thfloor.cfg if your choose hq_5thfloor printer for printing a concurrent request.For other printers, PASTA will continue to look for pasta.cfg
  • Other configuration file.
You can change the file that is defined as the default configuration file for Pasta by using the -F command line parameter.For example, suppose you create a PCL print - specific configuration file named pcl.cfg. Set the FNDPSTAX command line option as follows: -Fpcl.cfg Pasta will look for pcl_.cfg first, and if it is not found, Pasta will use pcl.cfg as the default. These files must be placed under the $FND_TOP/resource directory.The -F command line parameter can be set in the Arguments field of the Printer Drivers window

If Pasta already set up and we are going upgrade of pasta by applying patch then Config Actions Done after application of patch.
  • On UTF8 character set environments (UNIX only), ensure the toolkit Tk2Motif.rgb resource files, under the 8.0.6 Oracle Home, are configured for UTF8. For all Tk2Motif.rgb files located at $ORACLE_HOME/guicommon6/tk60/admin and $ORACLE_HOME/guicommon6/tk60/admin/ open the file using any text editor and modify the line that looks like this: !Tk2Motif*fontMapCs: iso8859-2=EE8ISO8859P2 Change the line to look like this: Tk2Motif*fontMapCs: iso8859-1=UTF8
  • Copy the file named: $ORACLE_HOME/guicommon6/tk60/admin/Tk2Motif.rgb to: $ORACLE_HOME/guicommon6/tk60/admin/Tk2Motif_UTF8.rgb
  • verify or set the XENVIRONMENT environment variable to point to the Tk2Motif_UTF8.rgb resource file within the main environment file (generally specified by $APPLFENV) $ XENVIRONMENT=$ORACLE_HOME/guicommon6/tk60/admin/Tk2Motif_UTF8.rgb) $ export XENVIRONMENT
  • Use the following command to determine the current patch set level of Developer 6i and Forms version:
  • (Developer 6i patch set 10 or higher (Oracle Forms version 6.0.8.19 or greater)
$ rwrun60 \? | head -2 Report Builder: Release 6.0.8.27.0 - Production on Tue Jan 1 22:26:07 2008

$ f60run \? | head -2 Forms 6.0 (Forms Runtime) Version 6.0.8.26.0 (Production)

example :$ echo $APPLFENV SID_.env

Sample Example how to setup a new printer.
1. Add the following entries on "/sid/applmgr/product/806/sid_hostname.env" file,

IX_PRINTING="/sid/applmgr/1159/fnd/11.5.0/resource/ixlib.cfg" ;export IX_PRINTING
IX_RENDERING="/sid/applmgr/1159/fnd/11.5.0/resource/pasta.cfg" ;export IX_RENDERING

2. Add the following lines on pasta.cfg file under the [DEFAULT] section, preferably
within the "Font Name" area, make sure to make a display font path entry as follows

displayfontpath=/sid/applmgr/1159/fnd/11.5.0/resource/ALBANYWT.ttf

3. Make the following changes on "$FND_TOP/resource/pasta.cfg" file

From :

%% For Western European (Latin-1) languages
[AMERICAN,CATALAN,GERMAN,DANISH,SPANISH,LATIN AMERICAN SPANISH,FRENCH,CANADIAN
FRENCH,ENGLISH,ITALIAN,ICELANDIC,NORWEGIAN,DUTCH,PORTUGUESE,BRAZILIAN PORTUGUESE,SWEDISH,FINNISH]

Font.Default.Plain = printer:Courier
Font.Default.Bold = printer:Courier-Bold

To:

%% For Western European (Latin-1) languages
[AMERICAN,CATALAN,GERMAN,DANISH,SPANISH,LATIN AMERICAN SPANISH,FRENCH,CANADIAN
FRENCH,ENGLISH,ITALIAN,ICELANDIC,NORWEGIAN,DUTCH,PORTUGUESE,BRAZILIAN PORTUGUESE,SWEDISH,FINNISH]

Font.Default.Plain=//ADUO.ttf
Font.Default.Bold=//ADUOB.ttf

%% Font.Default.Plain = printer:Courier
%% Font.Default.Bold = printer:Courier-Bold
4. Make the following changes on "$FND_TOP/resource/ixlib.cfg" file

From :

%% For Western European (Latin-1) languages
[AMERICAN,CATALAN,GERMAN,DANISH,SPANISH,LATIN AMERICAN SPANISH,FRENCH,CANADIAN
FRENCH,ENGLISH,ITALIAN,ICELANDIC,NORWEGIAN,DUTCH,PORTUGUESE,BRAZILIAN PORTUGUESE,SWEDISH,FINNISH]

Font.Default.Plain = printer:Courier
Font.Default.Bold = printer:Courier-Bold

To:

%% For Western European (Latin-1) languages
[AMERICAN,CATALAN,GERMAN,DANISH,SPANISH,LATIN AMERICAN SPANISH,FRENCH,CANADIAN
FRENCH,ENGLISH,ITALIAN,ICELANDIC,NORWEGIAN,DUTCH,PORTUGUESE,BRAZILIAN PORTUGUESE,SWEDISH,FINNISH]


Font.Default.Plain=//ALBANYWT.ttf
Font.Default.Bold=//ALBANYWT.ttf

%% Font.Default.Plain = printer:Courier
%% Font.Default.Bold = printer:Courier-Bold
5. As per Note 189708.1, make a printer entry in the file
$ORACLE_HOME/guicommon6/tk60/admin/uiprint.txt as follows:

TargetPrinter:PostScript:2:PrinterDescription:default.ppd:

*** Important ***

Customer have to update the Target printer

*** Important ***

6. Correct for known bug 2850034--a missing portrait prt quote.

In file $FND_TOP/reports/PSTPL.prt change the line
printer Pasta Portrait Letter" to printer "Pasta Portrait Letter"

7. Login into System Administartor --> Install --> Printer --> Print Driver
Query the PASTA_LANDWIDE print driver and lower the font size option (-s#) to 7 points or
smaller.

-pn$PROFILES$.PRINTER -f$PROFILES$.FILENAME -c$PROFILES$.CONC_COPIES -l -s7.

8. Log out and log in ,verify echo $IX_PRINTING and echo $IX_RENDERING

9. Bounce the concurrent manager.

Setup Phase:

I. PRINTER
The Oracle Applications printer name must be the same printer name that works at the Operating System (OS) command line on the server where the concurrent processing server resides. If files in Postscript format will be generated and printed from Oracle Applications, make sure to setup a raw OS print queue so that Postscript files will be passed to the target printer without any filtering or actions by the OS print queue or print command. II.

II PRINTER TYPE

A printer type lists which styles and drivers are available to the assigned printer.

III. PRINT STYLE
A print style specifies the layout of the report’s output file. It is also matched with a driver that supports the same layout for printing.

IV. PRINT DRIVER
A printer driver provides the needed commands to initialize a printer and to invoke an OS print command or a print program or routine.

Concisely, the steps required to defined a printer for Oracle Applications are as follows:
  • Setup and verify the operation of the printer and print queue at the operating system level--test from the OS command line prompt.
  • Identify, select, or define a new Apps printer drivers that will support the specified printer make or model.
  • Identify, select, or define a new Apps printer type to register all needed printer styles and drivers.
  • Register an Apps printer name and associate an Apps printer type to the newly registered printer name
Printer setup is normally performed by the system administrator ( sysadmin ) responsibility. The sysadmin should have knowledge of navigation through Oracle Applications; as well as, knowledge of the OS configuration of printer you are attempting to define.

Printer Setup for Oracle Applications:
Responsibility: System Administration Navigation and Forms that will be used:
printer types - Navigate - Install - Printer - Types FNDPRTYP Printer - Navigate - Install - Printer - Register FNDPRMPR Print Styles - Navigate - Install - Printer - Style FNDPRRPS Printer Driver- Navigate - Install - Printer - Driver FNDPRMPD


Printer Types:

Printer types - Navigate - Install - Printer - Types FNDPRTYP

An example would be if you had a line printer, you may name it "LINE" or "LN03" for the model number of the printer.this name will be associated to the actual printer name when you register the printer to Oracle Applications.


Example of Printer Types:


Printer:
Printer - Navigate - Install - Printer - Register FNDPRMPR

You must have defined a printer type before you can register a new printer.The value for printer name will be the operating system printer name. Then choose the printer type that you defined in the previous step.


Styles:
Styles - Navigate - Install - Printer - Style FNDPRRPS Printer
If you are defining new styles specifically for your printer, you would do this here. Please review manual for the specific parameters needed to be defined. Oracle Applications reports are designed to work with standard shipped styles:
  • Portrait
  • Landscape
  • Land wide
  • A4
  • Dynamic Portrait


Drivers:
Driver- Navigate - Install - Printer - Driver FNDPRMPD
Oracle does provide the printer drivers for the above Styles, so unless you are adding your own, it should not be required to define one right now. If you are defining your own, you must specify a unique printer driver name and an unique user name for a given platform.


Lastly, if any new updates or changes have been made to any of the printer definitions,you must bounce the concurrent manager to ensure that all changes do take effect.


Setting Pasta In Debug Mode
Set the PASTA_DEBUG_LEVEL environment variable to 1 in order to capture additional information for a given concurrent request ID.
  • Set PASTA debug in your main Oracle Applications environment file, as pointed to by $APPLFENV.
  • PASTA_DEBUG_LEVEL="1" export PASTA_DEBUG_LEVEL
  • Bounce the concurrent manager and submit a concurrent request with print copies >= 1.
  • Look for $APPLTMP/pasta.in pasta.out and pasta.log
  • The file pasta.in contains the output file from the concurrent manager going into the PASTA utility for post-processing.
  • The file pasta.out contains the output file from the PASTA utility going to the printer via the OS print command for final printing. The pasta.log file contains the default pasta configuration options used to process the PASTA request and any error encountered while producing the PASTA out file. Note: These files are temporary files and they will be overwritten by the next concurrent request.
  • Note 2: If the debug file are not being generated after setting up the PASTA_DEBUG_LEVEL variable in the main environment file as pointed to by $APPLFENV, then define and export the same variable in the concurrent manager startup script (adcmctl.sh) and in the file $FND_TOP/bin/gsmstart.sh.


Monday, July 25, 2011

Mobile Wireless Applications (MWA)


Today’s demand for accurate, real-time information access,and inventory speed for several industries is forcing mobile applications to Find solutions for industries such as warehousing,manufacturing,Distribution, retailing, logistics, and transportation.

MWA will use wireless devices that support Internet Standards, Web Browser, and Telnet client.Technologies involved are Java, XML, TCP/IP, and Oracle 8i.Devices as hand held Radio Frequency (RF), Personal Digital Assistants (PAD’s), and Internet Phones are examples of mobile devices.

Agenda
  • Set up overview
  • Configuration Options
  • mwa.cfg file
  • Key Mappings (device IP.ini and default_key.ini)
  • Starting/stopping Mobile Apps Server
  • Starting Server on Multiple Ports
  • Configuring RF Devices
  • Accessing a Mobile Application.


Diagram Overview

Typical three-tier Internet architecture.
In the back-end is your 11i Applications server with Oracle database.
In the middle tier is the Mobile Supply Chain Applications server. This is analogous to the Forms server and HTTP server, but is used to deploy applications to Telnet clients.
The client in this context will typically be a mobile RF device running a Telnet client. The RF device communicates with the MSCA server through an access point.

You need to do two things to start using Mobile Supply Chain Applications.
Start the Mobile Supply Chain Applications Server (after configuring it).
Configure your RF devices so that they are communicating with the server.

Configuration Options:


  • Most of the server-related configuration parameters are located in the $MWA_TOP/admin/mwa.cfg file.
The important properties in this file are:
  • Dbc File
Used to connect to database. Stores username, passwd, database port, and other info used to login.
  • Log Directory
  • Sets the location of your log directory. We default to $MWA_TOP/log, but you may want to change this to point to your regular Applications log directory.
  • Telnet Port Number
You can set the port number on which you want the Telnet server to run.
Important: You should set the port to a number greater than 1024.
Anything less will require you to be root. The configuration file defaults to port number 2323

Settings for MWA Server:


Class Paths
/local/java/jdk1.4.2_04/jre/lib/rt.jar:
/local/java/jdk1.4.2_04/lib/dt.jar
/local/java/jdk1.4.2_04/lib/tools.jar:
/lafrz/mfg_top/mfgdev/dmfdv11i/java/appsborg2.zip
/lafrz/mfg_top/mfgdev/dmfdv11i/java

MWA Server
  • MWA Configuration File
  • Port Number Conventions
  • Environment Verification
  • Dispatcher Usage
  • Configuring MWA Dispatcher

MWA Configuration File

Configuration File is used to set server related properties:

Setup mwa.cfg as follows:

Locate file in $MWA_TOP/Secure/hostname_
Copy mwa_template.cfg to mwa.cfg
Edit mwa.cfg and configure following parameters:

a. Set mwa.DbcFolder = Full directory of .dbc file ending with /
b. Set mwa.DbcFile = dbc file name
c. Set mwa.logdir = full directory of log file
d. Set mwa.TelnetPortNumber = default port#
e. Set mwa.DropConnectionTimeout = no. of minutes
f. Set mwa.StaleSessionTimeout = no. of minutes
g. Set mwa.LogLevel = error or trace


Key Mappings $MWA_TOP/admin/default_key.ini
  • You can map device keys to server-defined functions in .ini files. These are located in $MWA_TOP/admin.
  • There is a default_key.ini file in there already, which can be used as a template for the specific devices you might be using.
  • The server will use the default_key.ini file if it cannot find the appropriate .ini file for your device.
  • The syntax is action=key=Description
  • So, for example, killing (or erasing) an entire line in a text field is set to Control+K.
  • You can change this to F9, for example, if Control Keys are not easily accessible on your device.
  • In these .ini files, you can also specify the devices height and width so the server knows how to format the output.
  • The idea is to create a new.ini file for each type of device you have.
  • For example, if your company is using Intermec Trakker 2415s, create an intermec2415_key.ini file that is based off the default_key.ini file, but has height, width, and key settings for the Trakker 2415.


Kep Mappings : $MWA_TOP/admin/deviceIP.ini

  • You associate your device witha key mapping file you’ve created in the $MWA_TOP/admin/deviceIP.ini file.
  • Two ways to do this.
  • First way...
  • If your devices are DHCP, put in a line like: Intermec 2415=intermec2415_key.ini
  • Options on the left of the equal sign will appear before users log in.
  • The user must select the option corresponding to the device he/she is using.
  • Second way...(preferred way)
  • If your devices are on Static Ips, you can specify which IP addresses should be associated with which key mapping file.
  • For example, 130.35.112.*=intermec2415.ini
  • In this case, the options screen is not shown and the user doesn’t have to select anything. The server automatically knows which key mapping file to use based on the device’s IP.
Port Number Conventions

Test Instance:
Dispatcher port = 30500
Telnet Server ports = 30502,30504,30506

Development Instance:
Dispatcher port = 30700
Telnet Server ports = 30702,30704,30706

Production Instance:
Dispatcher port = 30000
Telnet Server ports = 30002,30004,30006


Environment Verification

  • Verify that correct port numbers as per convention has been used
  • Verify the environment that is set correctly by sourcing the APPS_.env file
  • Verify $MWA_TOP is set correctly
  • Verify the DbcFolder and the DbcFile in the mwa.cfg file that is set to the location and filename of our Oracle Application .dbc file
  • Verify the log directory that exists
Dispatcher Usage

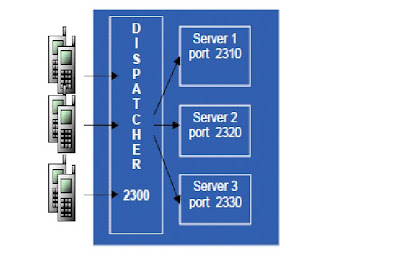
Two Consecutive ports are needed per one MWA Server.
One port is for listening to RF device. The Other port
is for listening to the MWA Server Manager.Three
consecutive ports are needed for running the dispatcher.
Mobile Users connect to Dispatcher port 2300.
Dispatcher distributes mobile users among the three MWA servers.


Configuring MWA Dispatcher

Setup Dispatcher parameters in mwa.cfg:

1) Specify the port number and machine for running the dispatcher
mwa.Dispatcher = hostname:port#

2) Specify the dispatcher worker thread count. No. of connections per MWA Server.
mwa.DispatcherWorkerThreadCount = 15

3) Specify the dispatcher clients per worker. No. of MWA servers per Dispatcher.
mwa.DispatcherClientsPerWorker = 10

Before Starting the Server

Be sure the following is true:You’ve installed Oracle Applications 11i.
  1. You have logged onto your Applications machine as user oracle.
  2. The mwa.DbcFile parameter is set to the location of your Applications’ .dbc file. This property is set in your $MWA_TOP/admin/mwa.cfg file.The .dbc file is used for storing all the information the server needs to log into your database (e.g., name of the server, database port, etc.)
MWA Server JVM Memory Allocation

Set MWA Server JVM Memory Size
Unix - $MWA_TOP/bin/mwactl.sh
NT - $MWA_TOP/bin/mwactl.cmd

Parameter VMCONFIG="-mx256m -ms128m"

No. of users/Server Memory allocation
5 to 10 -mx128m -ms64m
10 to 15 -mx256m -ms128m

Initialization Parameter File : $MWA_TOP/secure/default_key.ini

Devices Specific Info
DATASTREAMINDICATOR=28
DEFAULT_WIDTH=20
DEFAULT_HEIGHT=16
DEFAULT_TERM_TYPE=VT100
CHARACTER_SET=UTF8
PROMPT_RATIO=1:1
MWA Navigation Keys
MWA_HELP=F1
MWA_MENU=F2
MWA_BACK=F3
MWA_FORWARD=F4
MWA Function Keys
MWA_CLEAR_FIELD=CONTROLK
MWA_LOVSUBMIT=CONTROLL
MWA_MAIN_MENU=CONTROLN
MWA_MESSAGE_DETAIL=CONTROLB
MWA_FIELD_DETAIL=CONTROLA
MWA_BUTTON_ACCLRTOR=ESC
MWA_PAGE_UP=CONTROLD
MWA_PAGE_DOWN=CONTROLC
MWA_ABOUT_PAGE=CONTROLX
MWA_FLEX_POPUP=CONTROLF
MWA_FLUSH_INPUT=CONTROLE
MWA_DROP_CONNECTION=CONTROLZ
INV Function Keys
INV_GENERATE=CONTROLG
WMS Function Keys
WMS_SKIP_TASK=CONTROLS
WMS_INVOKE_DEVICE=CONTROLP

Initialization Parameter File : $MWA_TOP/secure/deviceIP.ini

[device]
DEFAULT=default_key.ini
SYMBOL=gui_key.ini
INTERMEC=intermec.ini

// Wildcard at the end of IP address is supported.
[map]
127.0.0.1=default_key.ini

Startup and shutdown Script

start_mwa.sh
export MWA_TOP=//applmgr/1159/mwa/11.5.0
export PATH=$PATH:$MWA_TOP/bin
export DISPLAY=:1.0
nohup //applmgr/1159/mwa/11.5.0/bin/mwactl.sh start 30002 &
nohup //applmgr/1159/mwa/11.5.0/bin/mwactl.sh start 30004 &
nohup //applmgr/1159/mwa/11.5.0/bin/mwactl.sh start 30006 &
nohup //applmgr/1159/mwa/11.5.0/bin/mwactl.sh start_dispatcher &

stop_mwa.sh

export PATH = $PATH:/sid/applmgr/1159/mwa/11.5.0/bin:/sid/applmgr/common/util/jre/1.1.8/bin
nohup /sid/applmgr/1159/mwa/11.5.0/bin/mwactl.sh -login mobileadm/mobileadm stop_force 30002 &
nohup /sid/applmgr/1159/mwa/11.5.0/bin/mwactl.sh -login mobileadm/mobileadm stop_force 30004 &
nohup /sid/applmgr/1159/mwa/11.5.0/bin/mwactl.sh -login mobileadm/mobileadm stop_force 30006 &
nohup /sid/applmgr/1159/mwa/11.5.0/bin/mwactl.sh stop_dispatcher &

Startup/Shutdown of MWA Servers and Dispatcher

To start the MWA Telnet Server:
1.Source the APPS_.ENV
2.cd $MWA_TOP/bin
3.mwactl.sh start [port number]
4. mwactl.sh start_dispatcher

1.To Shutdown the Telnet Server:
2.cd $MWA_TOP/bin
3.mwactl.sh -login xxx/yyy stop port#
where xxx is the application user id with system administrator responsibility and yyy is the application user password.
4.mwactl.sh stop_dispatcher

Follow the steps outlined to start the MSCA server.
  • Note that you can specify a port number when starting up the server. Specifying a port here will override the port specified in your mwa.cfg file.
  • Immediately after starting the server, check to see if it worked. Telnet to the Server with a PC’s Telnet client. telnet
  • There should also be a new java process running on your machine.
  • For Background running:
  • nohup mwactl.sh start 2323 &
  • Nohup = the process will continue to run even after user has terminated unix session
  • & = will launch the process in background mode

Problems Starting the Server:

  • Make Sure the port isn't already in use
  • Make Sure the Environment is set Correctly by sourcing the APPLSYS.env File
  • Make Sure the $MWA_TOP is set correctly
  • Make Sure the mwa.Dbc File Parameter in your mwa.cfg file is set to the location of
  • your oracle application dbc file.
  • Make Sure your Database is up and the users specified in the .dbc file valid.

Here are some things to watch out for if the server didn’t start up successfully.

Log file will look like ..
The APPLSYS.env may have been changed to user’s environment file. (Example: visus02.env)

Starting the server on multiple ports

For load balancing reasons, you may want to start up multiple servers.
Remember to start each server on a different port.
Also, remember that the Server uses port n+1 when communicating with Server Manager.
So, if you start on port 2323, then port 2324 is also taken, and port 2324 will not be able to be used.
A dispatcher can be used to route requests to one of the servers.
In the mwa.cfg file, modify the parameter "mwa.Dispatcher=hostname:port".
Set the hostname to the machine on which you want the dispatcher to reside. Set the port here as well.
mwactl.sh start_dispatcher to start
mwactl.sh stop_dispatcher to stop

Notes:
If you use the Dispatcher, we do not support the ability to reconnect from a dropped session and still get back to the same screen.
You must start the dispatcher from the same MWA_TOP you use to start the Telnet server.


Concurrent Program defn.

Sometimes, Customers specifically ask for defining
concurrent programs for startup/shudown of MWA
servers from front end in Oracle APPS 11i.

Steps for defining Concurrent program:

  • Copy start_mwa.sh and stop_mwa.sh to $XBOL_TOP/bin as start_mwa and stop_mwa
  • Login from front end, and define Concurrent program executables as HOST type
  • Define the concurrent program named as startup_mwa and stop_mwa
  • Test the same, if you have CRT from the customer for bouncing MWA
  • Update the Customer with successful results
Create Executables from Frontend for both Start MWA and Stop MWA.
Concurrent Program Executable : Concurrent -> Executable-> Define

Executable: MWA_START/MWA_STOP
Shortname:MWA_START/MWA_STOP
Application:Business Online
Description:TO Start MWA/To Stop MWA
Execution Method: Host
Execution file name: mwa_start/mwa_stop

Concurrent Program:

Program Name: MWA_STOP/MWA_START
Shortname: MWA_STOP/MWA_START
Application Name: Business Online

Executable

Name: MWA_STOP/MWA_START
Method: Host

Accessing a Mobile Application:


To get to a mobile application
1. Login
2. Select Responsibility.
3. Select Menu Item


Common Issues

Dispatcher and MWA ports getting reset after refresh or running autoconfig.
In Order to avoid autoconfig resetting the ports, we need to have standard ports on context file.
Parameters listed above.
Some times process doesn’t get cleared after the stop command issued. Wait for some time and always, please check netstat -i |grep . If you see port is still listening. Use lsof -i |grep
#>. Identify the process and kill them. When all ports are cleared start the services.
Post start service can done from desktop dos prompt or start -> run with
telnet . Repeate this for all ports including dispatcher to make sure you get login prompt.

Q. The Server doesn’t start successfully?
Q. The Server doesn’t allow me to connect if X users have already
connected?
Q. There is a long response time between the server and the client?
Q. The Server drops my connection to the server if I have been idle for more than a couple of minutes?
Q. Setting up of a cronjob for automatic bounce of MWA Servers


MWA Configuration Help

  • For MWA Configuration details, please see following metalink notes
  • Mobile Applications Technology Stack: 163931.1
  • MWA Dispatcher port number usage: 170939.1
  • MWA Dispatcher Usage and Example: 198543.1
  • Important MWA Dispatcher Fix:
  • MWA Dispatcher linking MWADIS executable Bug 2284935


Friday, July 15, 2011

Changing of passwords for Different Users in Oracle Applications

Category
1:


1. VIDEO31
2. VIDEO4
3. VIDEO5
4. PORTAL30_DEMO
5. PORTAL30_PUBLIC
6. PORTAL30_SSO_PS
7. PORTAL30_SSO_PUBLIC

Remediation Action:[Note: No Downtime Required for this type]
Command Syntax: alter user User_name identified by New_password
Category 2:

1. CFD
2. CSDUMMY
3. CSMIG
4. DGRAY
5. DLD
6. DMS
7. EDWEUL_US
8. EUL_US
9. HCC
10.JTI
11.JTR
12.JUNK_PS
13.MDSYS
14.MOBILEADMIN
15.OLAPSYS
16.ORDPLUGINS
17.ORDSYS
18.OUTLN
19.OWAPUB
20.PERFSTAT
21.PROJMFG
22.PTE
23.PTG
24.REPADMIN
25.RESTRICTED_US
26.SERVICES
27.SSOSDK
28.SYS
29.SYSTEM
30.ODM_MTR
31.TRACESVR
32.WEBSYS
33.WH
34.WIRELESS
35.XDB
36.CTXSYS

Remediation Action: [Note: No Downtime Required for this type]
1. alter user User_name identified by new_password

Category 3:

1. EDWREP
2. ODM

Remediation Action: [Note: Downtime Required,Shutdown the Applications Tier services on each of the Nodes]
1.FNDCPASS APPS/apps_pwd 0 Y SYSTEM/system_pwd ORACLE [EDWREP/ODM] new_pwd

Category 4:

APPS Base Product Accounts: ABM-ZX password:

ABM AHL AHM AK ALR AMF AMS AMV AMWAP AR ASF ASG ASL ASN ASO ASP AST AX AZ BEN BIC BIL BIM BIS BIV BIX BNE BOM BSC CCT CE CLN CN CRP CS CSC CSD CSE CSF CSI CSL CSM CSP CSR CSS CUA CUE CUF CUG CUI CUN CUP CUS CZ DDD DOM EAA EAM EC ECX EDR EGO ENG ENI EVM FA FEM FII FLM FPA FPT FRM FTE FUN FV GCS GL GMA GMD GME GMF GMI GML GMP GMS GR HR HRI HXC HXT IA IBA IBC IBE IBP IBU IBY ICX IEB IEC IEM IEO IES IEU IEX IGC IGF IGI IGS IGW IMC IMT INV IPA IPD ISC ITG JA JE JG JL JTF JTM JTS LNS ME MFG MRP MSC MSD
MSO MSR MST MWA OE OKB OKC OKE OKI OKL OKO OKR OKS OKX ONT OPI OSM OTA OZF OZP OZS PA PJI PJM PMI PN PO POA POM PON POS PRP PSA PSB PSP PV QA QOT QP QRM RG RHX RLA RLM SSP VEA VEH WIP WMS WPS WSH WSM XDO XDP XLA XLE XNB XNC XNI XNM XNP XNS XTR ZFA ZPB ZSA ZX

Remediation Action: [Note: Downtime Required,Shutdown the Applications Tier services on each of the Nodes]
1. FNDCPASS APPS/apps_pwd 0 Y SYSTEM/system_pwd ALLORACLE new_pwd ----At a time all users password will change
[ Please keep password same as apps password for these set of users]

FNDCPASS apps/xxx 0 Y system/xxx ORACLE ICX ICX ---For single user

Category 5:

1. PORTAL30
2. PORTAL30_SSO

Remediation Action: [Note: Downtime Required,Shutdown the Applications Tier services on each of the Nodes]

1.FNDCPASS APPS/apps_pwd 0 Y SYSTEM/system_pwd ORACLE [PORTAL30/PORTAL30_SSO] new_pwd

2.Modify APACHE modsql Password on All Middle Tiers:
if $IAS_ORACLE_HOME/Apache/modplsql/cfg/wdbsvr.app exist then change APPS password in the file else
if $ORACLE_HOME/listener/cfg/wdbsvr.app exist then change APPS password in the file else
if $IAS_ORACLE_HOME/listener/cfg/wdbsvr.app exist then change APPS password in the file

Category 6: only in 11i we need to update the files, in R12 this are hardcoded.

Take the backup As a precaution, please back up the FND_ORACLE_ID and
FND_USER tables before beginning.

1. APPLSYS
2. APPS
3. APPS_MRC

Remediation Action: [Note: Downtime Required,Shutdown the Applications Tier services on each of the Nodes]
1. FNDCPASS apps/apps_schema_password 0 Y system/system_schema_password SYSTEM APPLSYS new_password
Ex: FNDCPASS apps/apps 0 Y system/xx SYSTEM APPLSYS New_password

To update the Apache configuration files with the new password execute a short autoconfig run for
the specific templates.

The following command is to be executed on all nodes for the particular instance we are updating.
Note the command must be executed on one line.

$AD_TOP/bin/adconfig.sh -appspass={NEW_APPS_PASS} -run=INSTE8
driver=$FND_TOP/admin/driver/fndtmpl.drv -contextfile=$CONTEXT_FILE


2.Modify Notification Mailer Password:
On All Middle Tier Nodes open $FND_TOP/resource/wfmail.cfg and change APPS password if mentioned in file.

3.Modify Reports CGI Password:
On All Middle Tier nodes open (806 OH) $ORACLE_HOME/reports60/server/CGIcmd.dat and change APPS password.

4.Modify APACHE modsql Password on All Middle Tiers:
if $IAS_ORACLE_HOME/Apache/modplsql/cfg/wdbsvr.app exist then change APPS password in the file else
if $ORACLE_HOME/listener/cfg/wdbsvr.app exist then change APPS password in the file else
if $IAS_ORACLE_HOME/listener/cfg/wdbsvr.app exist then change APPS password in the file

5.Drop and Recreate the db links:
· sqlplus -s apps/$NEW_PASSWORD
· set feedback off;
· set head off;
· set echo off;
· set pagesize 0;
· set term off;
· set trimspool on;
· col owner format a15;
· col db_link format a30;
· col username format a15;
· spool /tmp/db_links_tmp
· select owner, db_link, username from dba_db_links where owner in ('APPLSYS','APPS') ;
· spool off;
· For each DB_LINKS found in upper select statement do the following:
1. sqlplus -s $OWNER/$OWNER_PASSWORD
2. drop database link ;
3. create database link connect to ( APPS OR APPLSYS) identified by "" using '’;

–If you have configured E-Business Suite with 10g Application Server SSO/OID then after changing APPS password, update provisioning profile with new apps password

oidprovtool operation=modify \
ldap_host=oid_host ldap_port=oid_port \
ldap_user=”cn=orcladmin” ldap_user_password=password \
application_dn=”orclApplicationCommonName=app_name, cn=EBusiness,cn=Products,cn=OracleContext, dc=realm_name” \
interface_connect_info=db_host_name:oid_port:SID:apps:apps_password